
Navigation
Random Favorite Product
Hydraulic Press
Life is short. Buy this press. Dont build your own like I did Here
Advertisers
1968 Corvette
Rotor Runout
In preparation for assembling the rest of the frame, I decided to set the brake rotor runout before I bring the chassis back from storage. I start out by cleaning and painting the rear rotors the same way I did the fronts. I used Evapo-Rust to remove the rust and then painted it with high temperature paint. The one thing that I did differently with the rear rotors is that I didn't paint the inside of the rotor's "top hat". Just like having paint on the spindle, paint on the rotor's inside can affect the true rotor run out.

The rotors seemed to be slightly warped so I brought them to a local high school to have them turned. The shops in the area wanted $20-$25 per rotor compared to the high school which charged me only $5. Not only was it cheaper but the money goes to a good cause. I couldn't resist.

In my research for this project, I read that shims are the best way to compensate for any unnecessary runout. Assuming that I would need them, I fabricated a few out of an old beer can. The beer/ soda can's aluminum is around 0.004" thick which makes it the perfect material for shims since that size can be sanded or stacked to get the desired thickness. I simply traced a socket to get a perfect circle, marked/ drilled the center out very carefully, and then cut the circle out with typical household scissors. They make a tool that can punch out shims like this but I didn't think it was worth the money for such an easy thing to build by hand.
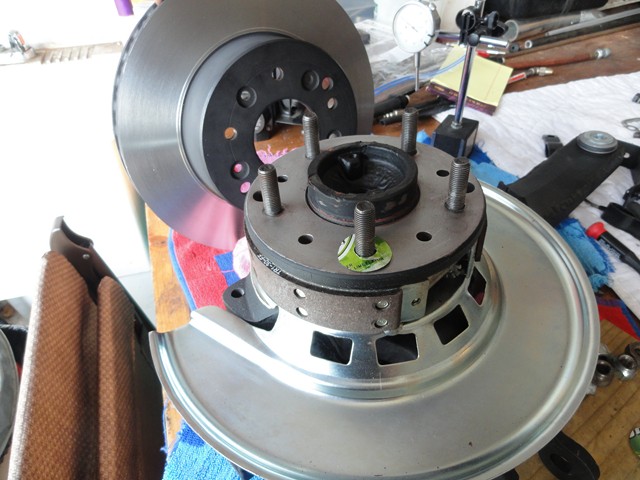

I started by attaching the rotor to the spindle without any shims and tightening the lug nuts. I used all five lug nuts the first time but then realized that three would have the same effect. With the rotor tightened down, I can check the rotor runout by placing the micrometer perfectly at a 90 degree angle to the rotor. A slight angle in any direction can give the micrometer a false reading so precision is key here. I can't recall what the exact spec should be but typically you should be fine if your runout is under .005" but most people aim for around .002".
The first time I did it I got around .0045 without using any shims. I wanted to see if I could do better so I removed the rotor, rotated it to the next lug nut stud over, retighten the lug nuts, and remeasured the runout. I repeated this process on each lug nut and found that one gave me a reading of slightly above .002". Good enough for me! I marked both the lug nut stud and rotor and moved on to the next one.


I did the same on the other side which, lucky enough, also came close to .002''. Fortunately, the shims were not necessary on either rotor and I can throw them away.
This job can be easily done while the trailing arms are on the car but I figured it would be easier while they were on the work table. Now that the rotor runouts are set, they will be ready when it comes time to reassemble the chassis.
Have a Question About This Article? Ask It Here!